Remote Desktop Administration
What is it?
Remote Desktop
Administration allows a user with appropriate privileges to connect to his/her
computer at Rice from another computer, similar to the way one may connect to a
UNIX machine via Secure Shell Client. Similar
to the Secure Shell connection, user can do anything he would be able to do
while working at the computer locally.
Since a Windows machine has GUI associated with it, the connection speed
requirements to remotely administer a machine are much greater than those
associated with its UNIX counterpart.
Some of the features can be disabled for slower, e.g. dialup,
connections to improve performance.
Once a remote connection
is activated, a window will be brought up on you machine at home which will contain
the desktop of your machine at Rice. You
may then work on the machine as if you were present locally, with the audio and
video being piped to you machine at home.
You may minimize your connection while still staying connected to the
machine, essentially allowing you to work on two computers at once. By default, when operating a remote desktop
connection your home printer becomes the default printer, but this can be
changed by selecting whatever Duncan Hall printer you would like to print to in
whatever application you would like to print from.
Virtual Private Network
To ensure the security of
you Rice machine, only users with a Virtual Private Network service installed
on their computers will be able to remotely connect to a Rice Windows machine. The VPN was
implemented to help protect
- from Graduate Apartments
- by connecting to activated network ports on
Campus
are not
considered remote users and thus do not need to initialize Virtual Private
Network Service. However, students
connecting from home using any Internet Service Provider are considered remote
users and need to logon to Virtual Private Network Service in order to
authenticate themselves.
For more information about
Virtual Private Network go to http://www.rice.edu/IT/network/remote_access/vpn/index.html.
How to set up your remote desktop connection
You need to have all of the following in order to
remotely administer your Rice machine from home:
- Windows XP (professional edition) or Windows
2000 on the Rice machine
- Windows’98 or greater on your home machine
(Windows XP is easiest)
- Administrative privileges on the Rice machine OR
membership in ‘Remote Administrators’ user group
- Virtual Private Network (VPN) connection
- Remote Desktop Connection Wizard (included
with Windows XP Professional edition)
- Internet connection (on both computers)
Windows XP Professional
Edition users should follow the steps outlined below to set up their VPN
accounts and Remote Desktop Administration connection. Note that Remote Desktop Administration is
not supported by Windows XP Home Edition.
- E-mail
problem@rice.edu and ask to be added to “Remote Administrator”
user group. If you have
administrative privileges on your Rice machine go to step 2.
- Apply for and configure a VPN 3000
account
- VPN 3000 software download
information is only available to Rice VPN 3000 account holders. Use a web
browser on any computer on the Rice campus to visit http://apply.rice.edu/. Follow the prompts to apply for a new
account. You will be required to
submit your First and Last name along with your student ID number found on
the front of your Rice University ID card. Note that the process of processing
your application may take several days, depending on the number of
requests that have to be dealt with.
Once your application has been approved you should receive an
e-mail.
- Visit the
- Follow the instructions on http://www.rice.edu/IT/network/remote_access/vpn/vpninstall_WinXP.html
to download and install your VPN software. After you have completed this step you
should have a VPN service installed on your home machine. You will need to start this service
every time you want to initialize Remote Desktop Connection, unless it is
already started.
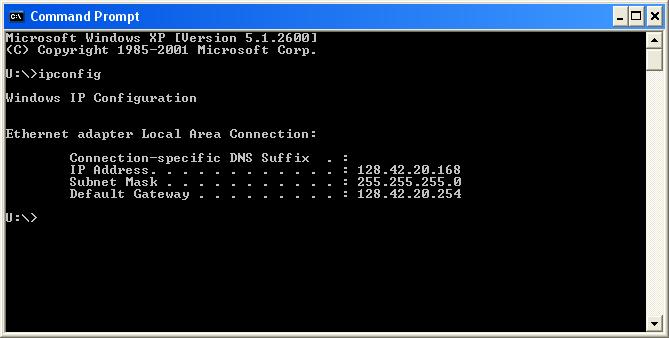
- Obtain
your IP address. On your Rice machine go to Start ® Programs ® Accessories ® Command Prompt. Once the MSDOS command prompt pops up,
type “ipconfig”. You should
probably remember your IP address, since that is the easiest way for the
IT department to access your machine if you want them to help you with
something.
- Setup Remote Desktop Connection. On your home machine go to Start ® Programs ® Accessories ® Communications ® Remote Desktop Connection. Note that the instructions below apply
only the Remote Desktop Connection Software for the Windows OS. If you are operating a version of
Windows older than XP you will need to download this software at http://www.microsoft.com/windowsxp/downloads/tools/rdclientdl.mspx.
If you are using a Mac OS, you can get a
free version of remote desktop connection software at http://www.microsoft.com/mac/downloads.aspx?pid=download&location=/mac/DOWNLOAD/MISC/RDC.xml&secid=80&ssid=9&flgnosysreq=True
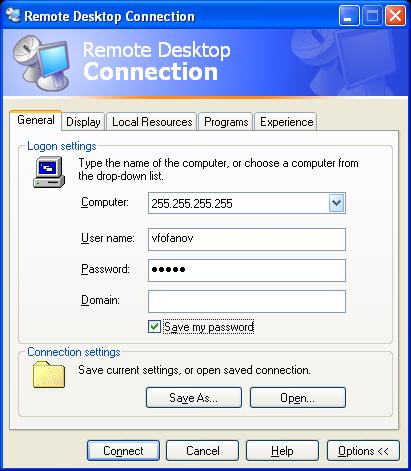
- Click on the “Details” or “Options” button to
view advanced options.
- Under the “General” tab, type in the IP
address of your Rice machine you got in step 3 in the “Computer” textbox
- Type in your username and password. Make sure that the account on the Rice
machine you are connecting to has the same name and password as your
Engineering Domain UNIX account.
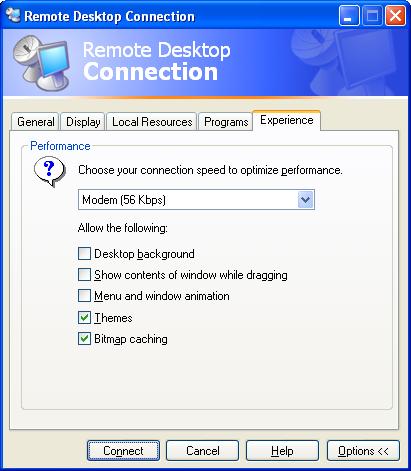
- Under the “Experience” tab customize your
connection by selecting the speed of your internet connection at
home. Faster speeds will enable
more options.
- Activate
Remote Desktop Connection.
- Initiate the VPN service by double clicking
the VPN icon. Clicking the
“Connect” button and providing the requested passwords
- Go to Start ® Programs ® Accessories ® Communications ® Remote Desktop Connection and click
“Connect”