Contents of this tutorial
- Virus protection under Windows
- Printing under windows
- Connecting to Rice wireless network
- List of useful software
Virus Protection under windows
Let’s face it, some people have way to much time on their hands and they
spend it trying to figure out how to crash your computer and in general cause
you as much pain and misery as possible.
As a university, Rice has a relatively large computer network and as
such is a target for some of these individuals.
Chances are that during your time here your computer will be infected at
least once by some virus or other. To
prevent this and/or to minimize damage from infection you need virus
protection.
Computers administered by the IT department are taken care of
automatically but any machine that you administer yourself, such as your home
computer or a laptop, needs to have antivirus software installed. As a student in
Once installed VirusScan
will continuously check the files you are accessing, including emails and
websites, against a list of known virus and Trojan profiles. If you do not want this feature on, for
example when you are defragging your hard drive, you can turn it off by
right-clicking on the VirusScan icon in the bottom-right corner of your screen
(on you taskbar) and selecting “Disable on-access Scan”.
If you suspect that you
have a virus but the usual scan has not picked it up or if you think you may
have gotten on while the VirusScan software was disabled/non-installed you may
initiate a forced “On-Demand” scan by right clicking on the VirusScan shield
icon and selecting “On Demand scan”. You
will be taken to the following dialog box, where you will be able to change any
of the scanning options you want (although default ones work very well). Once viruses and/or Trojans a found, they
will be cleaned from the files they infected and if that fails the infected
files can be quarantined so you can delete them later.

One thing to note, if you
suspect that your Rice machine has been infected by a virus and your VirusScan
software cannot detect it, yet you are experiencing a sudden drop in the
responsiveness of your machine or constant e-mails from angry M.D. Anderson
mail servers saying that they received an infected e-mail from you (even though
you’ve never sent one), the best thing to do is to notify the IT department via
problem. If they are too busy to fix the
problem, when these viruses attack they are extra swamped, they will let you
know what to do so you can fix it yourself.
Printing under windows
In order to use one of the printers in Duncan Hall you will need to be
part of the Engineering Domain, meaning you need to have username and password
for your PC Engineering account. You
should already have one, but if you don’t you can apply for one by emailing problem@rice.edu. If your machine is administered by the IT department
they will take care of it, however if you administer your own machine or bring
one to school (e.g. a laptop) you will need to create a new account. Note that the account name and password on
your personal machine would have to match your Engineering domain username and
password.
The steps for setting up printers discussed below apply only to the
machine physically connected to the Rice network, through either the wireless
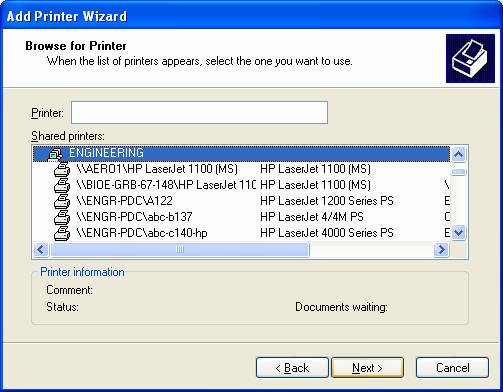
or Ethernet connection. To install a new
printer go to Start ® Settings ® Printers and
Faxes. Choose to install a network
printer and Browse for one until you find the appropriate printer.
The following are the
printers that can be used by the Department of Statistics Students:
- Black and White
printer: dh2093
- Color printer: dh2093
You can also install a printer by going to Start ® Run and typing “\\engr-pdc” and selecting the
printer you wish to install.

If you have appropriate
privileges an installation process should begin.
Connecting the Rice Wireless Network
What is it?
Duncan Hall along with
several other buildings on campus supports wireless networks. This means that users with wireless network
cards can connect to and use the
How to get connected to the Wireless
network
In order to connect to
The newer 802.11g standard would probably be best
but more expensive. Both of the
standards mentioned above have good signal strength and good speed, so when
buying one you should just make sure (or ask the salesperson to make sure) that
the wireless network card you are getting conforms to one of these standards.
The process of
installation for the wireless cards is dependent on the brand of the card you
buy, but unless otherwise specified you can always follow these steps:
- Turn off your
machine
- Plug in the
wireless card (on a laptop it will usually go into the PCI slot)
- Turn on your
machine
- Your Windows
Operating System should detect the new hardware and prompt you to provide
drivers for it. Follow the onscreen
instructions and provide the drivers from the CD or a diskette that came
with the wireless card.
After the wireless card is
installed the easiest way to connect to the wireless network is to have the IT
department do it for you (through problem@rice.edu)
but if you would like to do it yourself follow these steps (note the following
is for advances users and will not be in much detail).
- Go to Start ® Settings ® Network Connections and pick the connection
supported by your wireless card.
- Setup your TCP/IP protocol to use DHCP by
selecting “Internet Protocol (TCP/IP)” and clicking Properties.

- Open your Internet browser. It should automatically go to http://register.rice.edu/. If that didn’t happen (and you can
connect to the internet) change the URL manually. You should see something like…

- At this point follow the instructions on the
page to register your card with Rice DHCP host and you will be granted
access to the wireless network.
Note that you have to be in the building in order to get this done.
List of useful software
While at Rice you will
probably use many software packages, both academic and non-academic (such as
antiviruses). Below is a list of useful
software and their availability.
The following are free:
- Any Microsoft Development tool, which includes
compilers such as C++, Java, Visual Basic, MS Visual Studio, C#, etc.
- S-Plus (either through the IT department or
through the department of Statistics)
- R statistical package (R-Gui for windows)
available for download at http://www.ibiblio.org/pub/languages/R/CRAN/
- Mathematica via Rice Site License (you’ll have
to contact IT department)
- Scientific Workplace via Rice Site License
(you’ll have to contact IT department)
- McAfee VirusScan 7.1
The following have to be
paid for, either by you or your advisor:
- SAS
- UEdit32 (a very powerful text editing tool
under Windows that rivals many of the text editors previous found only on
UNIX)